Table of Contents
Units
Navigation
The tab is intended for creating monitoring units as well as their further control, editing and deleting.
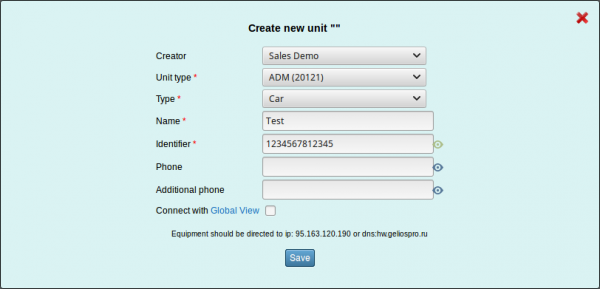
Add unit
- Creator - Specifies the user to whom the unit belongs;
- Unit Type – Data transfer protocol to be selected. A port is specified in brackets;
- Type - The unit is mobile or stationary;
- Name - The name of the unit displayed in the user interface;
- Identifier - A unique unit number, usually it is a serial number or IMEI;
- Phone - The phone number on the SIM card installed in the equipment;
- Additional phone - Additional phone number for communication with the unit;
- Connect with Global View - Global View offers services of satellite monitoring and automatic positioning of equipment on the Global Card to organizations, individuals and entrepreneurs.
Information field
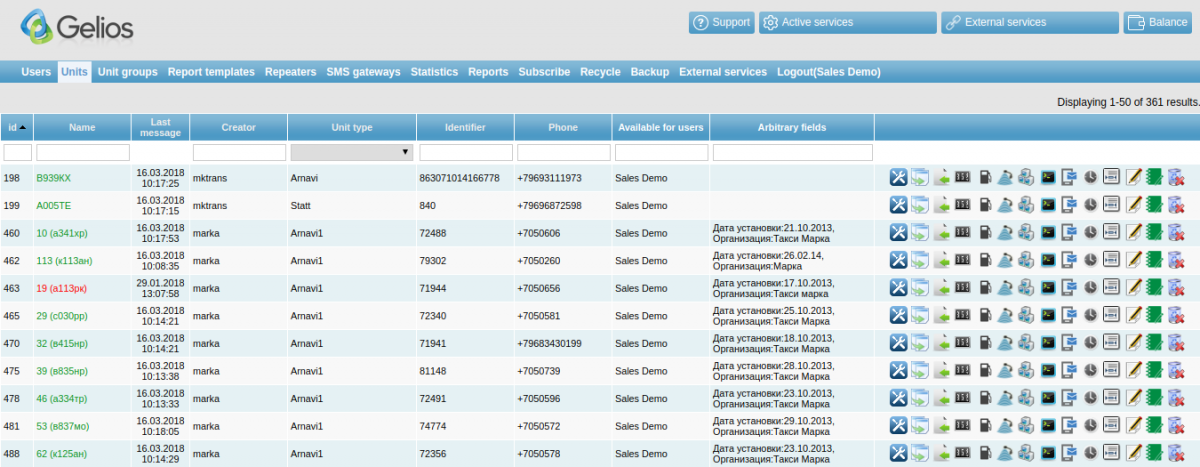
The main information window consists of the following columns:
| Id | Designates a unique number of the unit in the system. Id is assigned automatically and is not subject to editing |
| Name | Name of the created unit displayed in the monitoring system. Allows creating units with identical names |
| Last message | Date of the last message received from the unit |
| Creator | Specifies the user who created the unit and has all rights for it (a parent can assign an owner to the unit) |
| Type of equipment | Type of equipment installed on the unit. Supported equipment |
| Identifier | unit`s unique personal number. As a rule, the identifier is the IMEI of the device, series number etc. Creating units with identical identifiers and types of equipment is not allowed |
| Telephone | Phone number of the SIM-card installed in the equipment. This number is displayed in the user interface when receiving data on the unit |
| Available to users | The list of users having a possibility to perform actions with the unit |
| Arbitrary fields | A field for additional information of the unit. As a rule, information not falling under any of the categories is specified here. Searching unit on an arbitrary field is allowed in the user interface |
| Type | Determined whether the unit is mobile or stationary |
Control field
This part of the interface contains the main tools for managing units. Here are the following functional elements:
- Edit;
Options
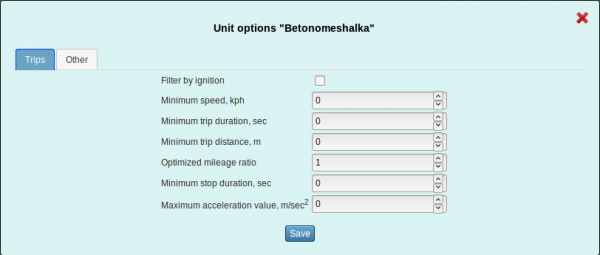
Trips
- Filter by ignition - Parameter responsible for filtration of the errors when determining the coordinates of a stationary unit;
- Minimum speed, km/h – Specify the minimum speed, from which the system starts to assume that the unit is moving (0 by default);
- Minimum travel time, sec - Specify the minimum driving time, which will be considered a trip (0 by default);
- Minimum travel distance, m - Specify the minimum distance that an unit must travel to be considered a trip (0 by default);
- Coefficient of adjusted mileage - Coefficient intended for correction and elimination of errors when calculating the mileage (1 by default);
- Minimum stop time, s - Specify the minimum time that is considered to be the stop the unit (0 by default);
- Maximum permissible acceleration value, m/s^2 - Parameter for filtering the error of mileage counting (0 by default).
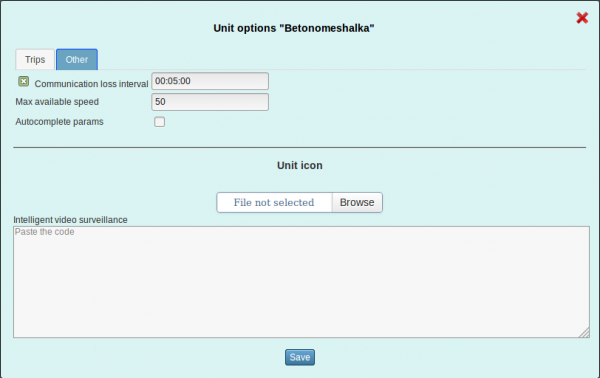
Other
- Connection loss interval - The time interval specified in seconds, based on which it is determined that the unit has disappeared from the connection;
- Maximum limit speed - Specify the value that will be the maximum speed for the unit. The number above the given value for the unit will be considered as exceeding the speed;
- Auto-completion of parameters – This paragraph allows displaying the latest actual data from the unit. Values are taken from the last message in which the required information was specified;
- Unit icon - Provides the ability to load the icon for the current unit (it is desirable to use the image in PNG format, square form);
- Smart video surveillance - A field for inserting the code of a cloud-based video surveillance system over the Internet from Ivideon.
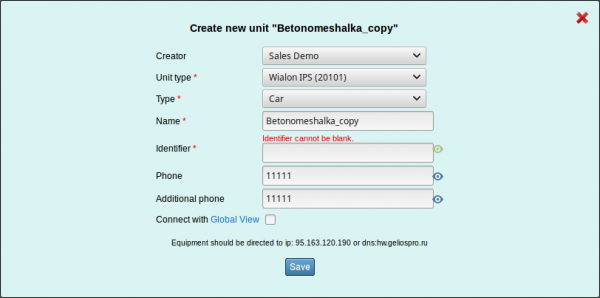
Copy unit
| | Copy unit. Creating a duplicate of the unit, except for the unique identifier, which is unique for each unit |
All fields are identical to the "Add unit" section.
WLN import
| | WLN import. Allows importing WLN files (WLN - Wialon message format) containing messages from the unit |
After creating an unit, you can import messages with parameters in WLN format for it. Some parameters may differ in the Gelios system from the parameters in the imported file, which leads to the fact that it is not possible to create a report for all of them. To represent these parameters in reports, you must create sensors with the appropriate parameters. However, if in the future the device sends messages with this parameter under a different name to the system, it is necessary in this case to create a special condition by which the sensor will take parameters to choose from. An example of such a condition: $in4|$adc5. The sensor in the incoming messages will look for IN4 or ADC5 parameter. Having found one of them, the sensor will transmit the value received from it.
Counters
As of the moment, there are two types of counters:
- Mileage;
- Operating hours.
The actual number of mileage or operating hours of the unit shall be specified in the value field. This value will be considered as a reference point for the monitoring system, and further calculations will be more correct.
| Important! The mileage counter operates when the ignition sensor is set (if any). If the sensor is set to an erroneous parameter and set to "Ignition", the counter value will not change. In order to avoid problems with the counter, it is necessary to set the sensor correctly, or to remove it at all. |
Fuel consumption
| | Fuel consumption. Provides an opportunity to set fuel consumption according to the norms in seasons, as well as according to the fuel level sensors |
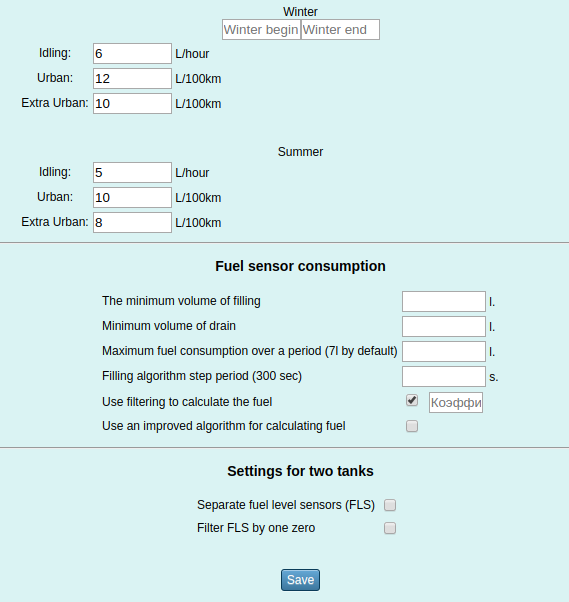
The section consists of two main blocks. The consumption rate is used when the fuel level sensors are not installed on the unit, but it is required to calculate the approximate amount of fuel spent.
Winter – Select a season of the year considered to be winter in the region.
- Idle – Specify the average value consumed by the unit when driving idle (Example: 5.6);
- In town – Specify the value consumed by the unit when driving in town (Example: 8.2);
- Out of town – Specify the value consumed by the unit when driving out of town (Example: 6.6).
Summer – Considered to be the rest of the period not included into the Winter period.
- Idle – Specify the average value consumed by the unit when driving idle (Example: 4.3);
- In town – Specify the value consumed by the unit when driving in town (Example: 7.9);
- Out of town – Specify the value consumed by the unit when driving out of town (Example: 5.4).
The second section Fuel consumption by the fuel level sensor calculates fuel on the basis of the data received from the fuel level sensor.
- Minimal volume of fuelling – Specify the number, under which the unit will be considered fuelled in future. (Example: 10);
- Minimal volume of fuel discharge – Specify the number, under which fuel is considered to be discharged from the unit; (Example: 3);
- Maximum fuel consumption for the period (7 litres by default) – Specify the consumption limit value for the accounting period of the data processing algorithm on fuel; (Example: 5);
- Fuelling algorithm step period (by default 300 sec) – Specify the time length for fuel level dynamics analysis;
- Use filtration for fuel calculation – This paragraph is intended for correcting the fuel accounting schedule. The coefficient is intended for excluding fuel seismic shifts due to various kinds of situations;
- Use a new algorithm for fuel calculation – this paragraph provides a possibility to use more modern algorithm on fuel calculation.
If there are two tanks in the units, the section Setting for two tanks shall be filled in.
- Separate fuel level sensors – Indicates to the system that in one tank of the unit, there are two fuel level sensors. Final fuel level value shall be accounted as an arithmetic average of values of all sensors;
- Filtrate the fuel level sensor at one zero – Messages where the parameters of one of the tanks are “0”, will be excluded.
Sensors
| | Sensors. Allows creating and editing various sensors. Sensors are designed to adapt the parameters received from the unit and manipulate them |
Sensors are designed to adjust the work with data from various types of devices installed on units. Devices send messages to the server with various parameters. Among such parameter, there are standard (speed, coordinates, number of satellites, etc.) and non-standard ones. Non-standard parameters have their own names, for which the sensors are designed.
Click the Add button to create a new sensor. After that, the window for adding a new sensor will open.
You should fill in the corresponding fields in the opened window:
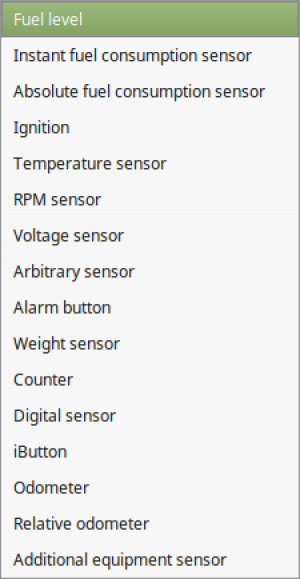
- Type – Specify the sensor type. To date, there are 15 various types (specified under the list);
- Name – Specify the name of the new sensor ;
- Parameter from the message – Specify the parameter according to which the sensor will operate. The list of parameters shall be determined according to messages sent by the device. Each device has its parameters;
- Measurement unit – Specify the value to be assigned to information received (example: l (litres), km (kilometres) etc.);
- Display – Allows displaying the name and value of the sensor in the user interface.
The list of the types of sensors
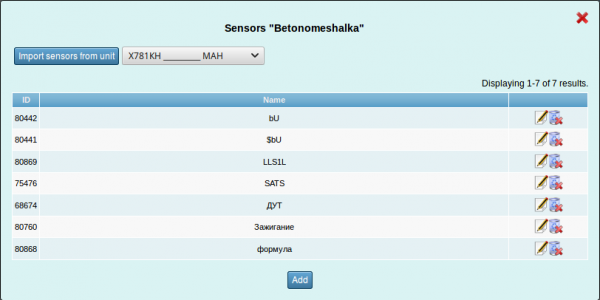
It is also possible to import previously created sensors from other units. For this purpose select the required unit from the drop-down list and click the button “Import sensors from the unit”. In this case, all sensors with all their settings will be copied to this unit.
Editing the sensor is necessary to make changes, as well as edit the calibration table.
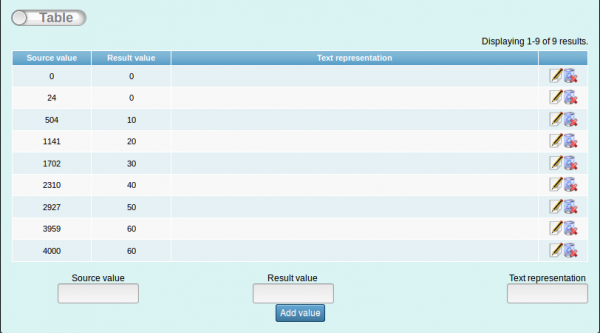
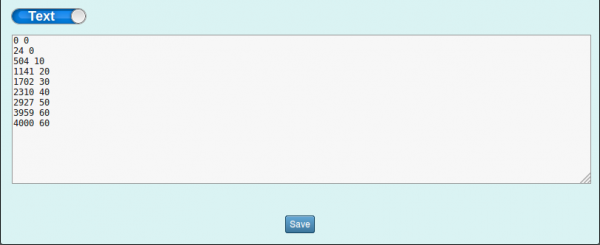
The calibration table is designed for working with incoming data. An example of filling a calibration table with an example of a fuel level sensor: The values are specified in accordance with the principle X (initial value) - Y (result value), where 0 parameter is not taken into account: Example (sensor/litres):
| Х (initial value) | Y (result value) | (text representation) |
| 0 | 0 | Empty |
| 24 | 0 | Empty |
| 504 | 10 | 1/6 of the tank |
| 1141 | 20 | 1/3 of the tank |
| 1702 | 30 | 1/2 of the tank |
| 2310 | 40 | 2/3 of the tank |
| 2927 | 50 | 5/6 of the tank |
| 3959 | 60 | Full tank |
| 4000 | 60 | Full tank |
In the first two lines, zero values of litres indicate the minimum values of “X” that the system does not take into account, with the maximum values of “Y” taken into account by the system indicated in the last 2 lines. Duplication of litres in the first two and the last two lines with a small value step is necessary to create a linear dependence for the system, which leads to more accurate calculations.
Included in groups
| | Included in groups. Allows adding or deleting an unit to different user groups. Used for working with a user group unit |
Provides an opportunity to add units to groups for different users. This function is necessary if you want to grant access to various units to different users.
Command templates
| | Command templates. Provides an opportunity to create command patterns that will be displayed in the user interface and intended to be sent to the device. |
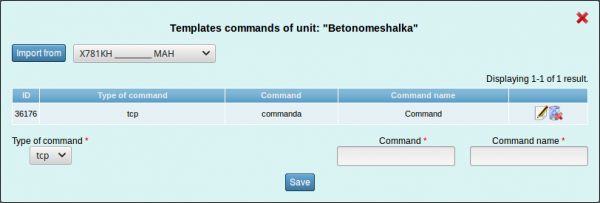
All the commands you have created are displayed in the opened window, as well as the ability of importing command patterns from other units. To use the command patterns, click on the drop-down list of a particular vehicle in the “Cars” tab, and select Command in the user interface. Then the list of created patterns will be displayed in the opened window.
Each command has a unique ID. Currently, you can select the type: tcp or gsm. The main purpose of the commands is the device remote control. Each device has its own set of commands. To find out the list of available commands or check the support for sending commands, you have to read the documents for this device or check with the manufacturer.
Send command
| | Send command. It allows sending various, specific content, commands to the device, which will execute them after receiving. |
To send a command, you must select the appropriate type:
- TCP - send commands via the Internet;
- GSM - sending a command via mobile communication.
Next, you have to enter the command in the field. Each device has its own set of supported commands. You can find out more about commands in the user's manual for the equipment or from the manufacturer. In addition to manual command input, configuration and firmware files can be downloaded. Commands will be sent in sequences.
Shifts
| | Shifts. The parameter is intended for creating and editing shifts on the selected unit for keeping statistics of the unit operation on the specified shifts |
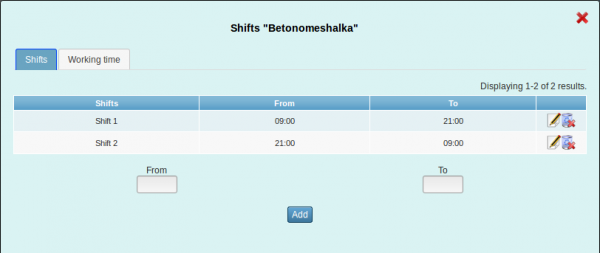
When creating a shift on the unit, its mode of operation can be defined. Besides, reporting is available in shifts, which will allow obtaining information about the unit operation within prescribed periods of time for different drivers. The shift window consists of two tabs specifying the required time periods.
The Shifts tab contains a table, in which a required number of shifts for the unit are created. In the “From” and “To” fields, the start time of the shift and the end time of the shift are to be entered. After creating the shift, it shall be added to the table. On the right side of the created shift there is the “Edit” and “Delete” elements. Editing the shift takes place in the input fields of the shift time.
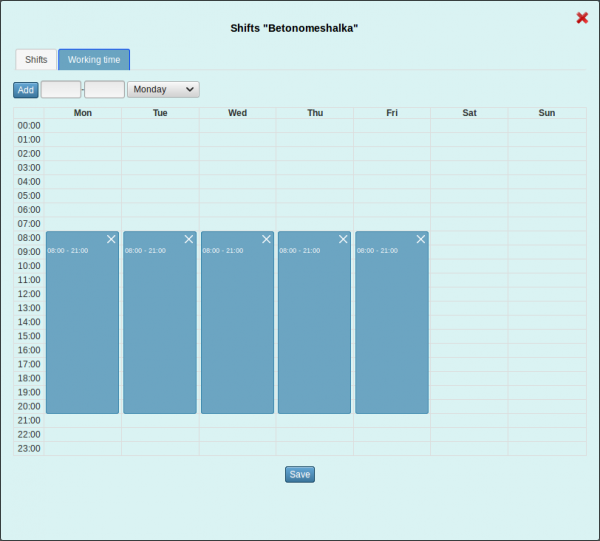
The second tab of the Working time window looks like a weekly calendar, where it is possible to create working time intervals. To create an interval, you should select the day of the week and specify the working time (example: 9 AM – 6 PM, Monday). After clicking the add button in the timeline, a block with working time will be displayed. Editing this block is possible by selecting the required block and changing its time in the input fields. It is also possible if you hold the cursor on the block, drag the block up or down in time, or hook the bottom edge of the block to drag it or expand it. It is also possible to create several working time intervals. For this purpose, it is necessary to add various time intervals for the selected day.
Arbitrary fields
| | Arbitrary fields. Creating and editing arbitrary fields of the unit is intended for entering additional arbitrary information by the user |
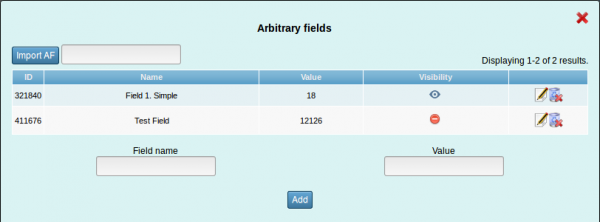
The main purpose of this unit is to create a unique note on the unit with the ability to display it in the user interface. The window for creating arbitrary fields consists of a table, import and input fields.
To import arbitrary fields, enter the name of the unit from which you want to copy all the arbitrary fields in the input field.
The table consists of the following fields:
- ID - Unique number of an arbitrary field;
- Title - Field name;
- Value - The value assigned to the field (arbitrary, user-defined);
- Visibility - Specifies whether or not to display this field in the user interface.
The input fields allow creating or editing arbitrary fields. In the Field name input field, specify the field name, in the Value field, specify the value of the corresponding field. It is also possible to create a report on arbitrary fields and their subsequent export in the formats: PDF, XLSX, HTML.
Edit
| | Edit. Allows editing the unit, changing its parameters, except for unique ones (similar to creating unit) |
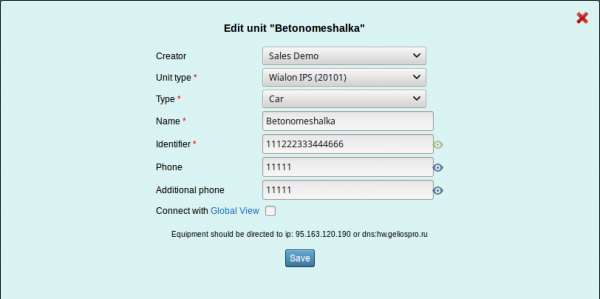
In the window, the system allows editing the following fields:
- Creator - The user who owns the specified unit;
- Unit type - Select the data transfer protocol. The port is indicated in brackets;
- Type - Determines whether the unit is mobile or not;
- Title - Specify the name of the unit displayed in the user interface;
- ID - Unique unit number, usually a serial number or IMEI;
- Phone - The phone number on the SIM card installed in the equipment;
- Additional phone - Additional telephone number of the unit;
- Connect with Global View - Global View offers services of satellite monitoring and automatic positioning of equipment on the Global Card to organizations, individuals and entrepreneurs.
Events log
| | Events log. The main purpose is to keep the history of successful activities on the unit, as well as to enter additional information that does not automatically go into the log |
In the log, you can filter the history by date or description, and edit or delete events. At the bottom of the window, there are fields for entering information, which will be placed in the table and sorted by date.
